ASTER

Quick Start Guide Windows 7x64
- Install the ASTER V7 software using the supplied
installer. Among the other installation options we recommend you to choose
Everyone to make ASTER V7 control panel available for every user.
After the ASTER V7 software has been installed, you will find two new shortcuts in your Windows Start menu:
-
 ASTER
Control - is to run the ASTER V7 control panel, where you setup,
enable or disable ASTER V7;
ASTER
Control - is to run the ASTER V7 control panel, where you setup,
enable or disable ASTER V7;
-
Run ASTER
workplaces - is to run extra workplaces manually, after ASTER V7 has
been properly setup and enabled.
These shortcuts may be not shown in the quick access list. You can always find them in the All Programs group.
Before extra workplaces could be run, the ASTER V7 software must be setup to let it know which monitor, input and sound devices are to be used at certain workplaces. Therefore the first shortcut you should open is ASTER Control.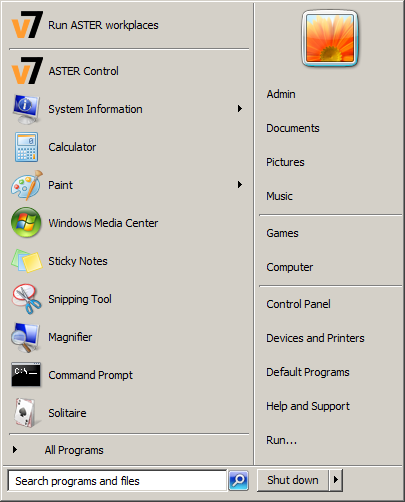
-
- Before the ASTER V7 software could be setup, it must
be activated either for a license or for a trial period. You are forced to
go through the activation procedure until you have successfully activated
the ASTER V7 software by one of these two ways. Activation procedure begins
when you open ASTER Control shortcut. You will be asked for
administrator privileges to proceed the activation.
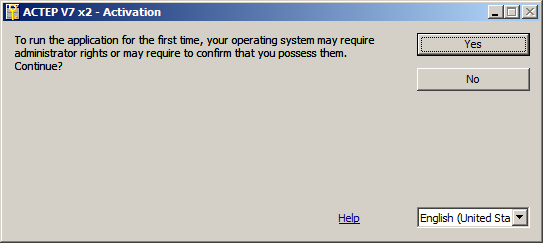
- After you have entered the activation procedure with
administrator privileges, you will be requested to choose the activation
way.
- If you run the ASTER V7 software first time, you
may activate it for a trial period. This way you may try ASTER V7 before
you decide to obtain a license. Trial period begins right after you
press Trial period button;
- If you have obtained a license, then you may activate the ASTER V7 software with the license serial number, and start using ASTER V7 with no time limits. License activation procedure begins if you press Activate button
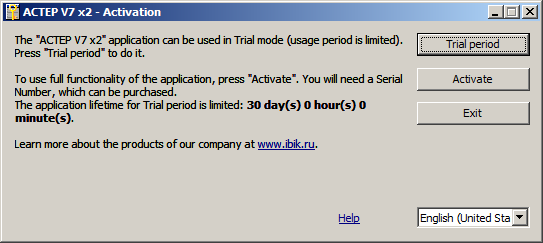
- If you run the ASTER V7 software first time, you
may activate it for a trial period. This way you may try ASTER V7 before
you decide to obtain a license. Trial period begins right after you
press Trial period button;
- Once you had activated the ASTER V7 software for a
trial period, you will be able to use ASTER V7 with no functional limits
until the trial period expires. After that you will be forced to either go
through the license activation procedure or exit the program.
If you have obtained a license while the trial period has been started but not expired yet, you may wait until it expires and activate the license later with the activation prompt, or you can start the activation procedure instantly with the SHIFT or CTRL key being held pressed while you open ASTER Control shortcut.
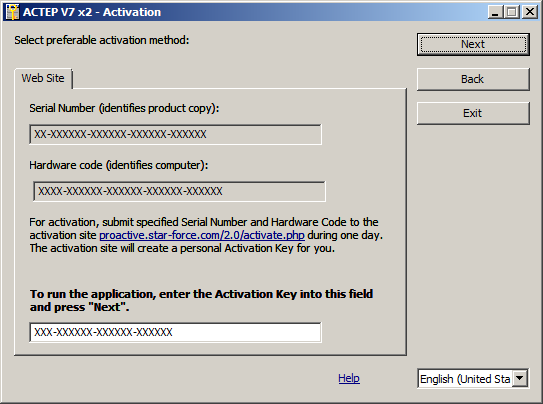
- If you have started the license activation procedure,
you will be requested for the license serial number. After you have typed or
pasted the serial number, you may choose one of two activation ways.
- Automatic activation - begins right after you
press Next button. It requires your PC to be connected to the
Internet at the moment;
- Manual activation - is a way to activate the ASTER V7 software using another PC connected to the Internet (when there is no Internet connection available at the place). To go this way follow other means or I already have an Activation Key hot links.
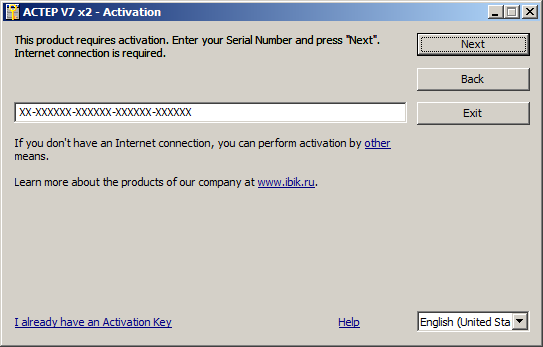
- Automatic activation - begins right after you
press Next button. It requires your PC to be connected to the
Internet at the moment;
- If you have chosen the manual activation way, you
will be requested for the activation key. To get the activation key you may
call your activation service (if available), or go to the activation page (proactive.star-force.com/2.0/activate.php)
using another PC connected to the Internet. Submit there the license
serial number along with the hardware code generated by the program. We
recommend you use copy&paste operations at this step to avoid mistypes.
If you could not get the activation key promptly, you may close the activation window and go through the manual activation anew when you have got the key.
- Since you had activated the ASTER V7 software by any
way, the ASTER Control panel will appear when you open ASTER Control
shortcut. Use this panel to setup ASTER V7 and arrange your video, input
and audio devices among the workplaces.
If you run the ASTER V7 software first time, you should perform the initial arrangement of video devices, otherwise you could not run extra workplaces because they have no monitors. It is necessary to setup video devices before you try to run workplaces, and other the devices can be setup later. Use Video tab of the ASTER Control panel to setup video devices.
- If you have just one graphics card installed and
two or more monitors connected to it, you can use every individual
monitor to run a workplace. As a result, several workplaces will run on
a single graphics card. To be able to setup individual monitors of a
single graphics card, check the Allow running several workplaces on a
multimonitor graphics card option.
- If you have several graphics cards installed, you
can setup each graphics card with all its monitors for the exclusive use
by a workplace. As a result, every workplace will use its own dedicated
graphics card (recommended for better gaming experience). To easier
setup several graphics cards for the exclusive use, uncheck the Allow
running several workplaces on a multimonitor graphics card option.
Then all the monitors of each graphics card will automatically join one
and the same workplace (so you have not to arrange manually all the
monitors but only the graphics cards).
- You may also use several multimonitor graphics cards, each one for running several workplaces. In this case if a workplace will use two or more monitors, it must not share a graphics card with another workplace.
To specify a workplace number for a video device, double click in the Place column, type the number and press Enter. We recommend you specify the workplace numbers in the ascending order (from up to down the list). When the new arrangement is done, it must be Applied. It will take an effect after PC is restarted.
Before enabling ASTER V7 with newly arranged video devices, it is highly recommended to extend the desktop onto all the monitors and setup desired resolutions for them to ensure the monitors are properly configured and well functioning. Use Display item of Windows Control Panel to extend the desktop and setup resolutions (Control Panel è Display è Change display setting).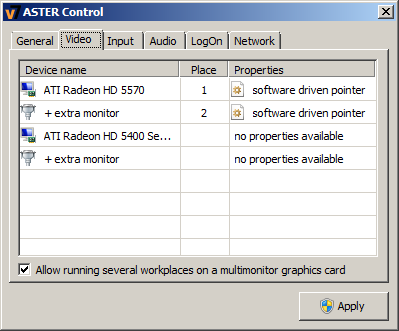
- If you have just one graphics card installed and
two or more monitors connected to it, you can use every individual
monitor to run a workplace. As a result, several workplaces will run on
a single graphics card. To be able to setup individual monitors of a
single graphics card, check the Allow running several workplaces on a
multimonitor graphics card option.
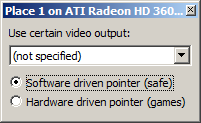
- There are some advanced options available for the
monitors of a shared graphics card. For
experienced users only, who can handle possible negative effects.
There you can setup the video device to use software- or hardware-driven
mouse pointer and certain type of video output (physical connector). These
options are available in the tool box opened with double click in the Properties column.
Software pointers are fully independent of each other but they may interfere with intense graphics (be erased or leave trails) while hardware pointers do not interfere with any graphics but they can not have different shapes. The latter is better for gaming and full screen graphics applications and the former is better for everything else. You may setup different monitors for using different types of pointer (for example, enable hardware pointer for the gaming workplace only).
Do not setup the video device to use certain type of video output unless you are sure it brings the expected results. In case of unexpected results you can go through the troubleshooting procedure described below.
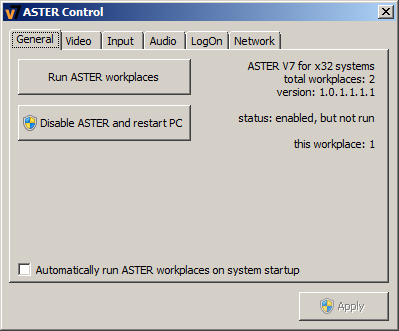
- After you have setup the video devices, you can
enable ASTER V7 and run extra workplaces. To enable ASTER V7 press Enable
ASTER and restart PC button on General tab of the ASTER Control
panel. Your PC will be restarted at once.
Troubleshooting. If you experience troubles while starting PC with enabled ASTER V7 and newly arranged video devices (for example, no image on the main monitor), you can reboot your PC in safe mode, disable ASTER V7 with Disable ASTER and restart PC button on General tab of the ASTER Control panel, and then setup different monitor configuration and arrangement. To boot PC in safe mode, press F8 key in the beginning of Windows startup (before Windows logo appeared) and select Safe mode option.Troubleshooting. If by some reason the system failed to check the digital signature of the ASTER V7 software, your PC will not startup normally and will fall into recovery console. To workaround this trouble you can reboot your PC with disabled check of digital signatures, and then disable ASTER V7 with Disable ASTER and restart PC button on General tab of the ASTER Control panel. To boot PC with disabled check of digital signatures, press F8 key in the beginning of Windows startup (before Windows logo appeared) and select Disable Driver Signature Enforcement option.
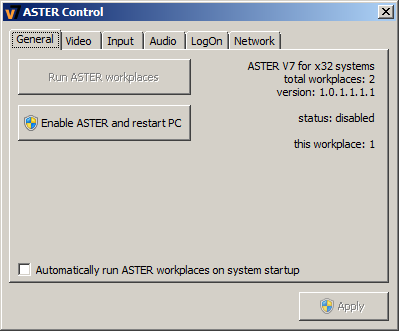
- After PC has been restarted with enabled ASTER V7,
you can run extra workplaces by pressing Run ASTER workplaces button
on General tab of the ASTER Control panel, or by opening Run ASTER
workplaces shortcut in your Windows Start menu. Windows welcome
screen must appear on all the monitors. Before you arrange the input
devices, you can switch your keyboards and mice all at once across the
workplaces with CTRL+F12 key and check if all workplaces are well
functioning.
If you find Run ASTER workplaces button disabled (grayed), it most probably means the video devices arrangement is not suitable for running extra workplaces. Then try to make different arrangement, Apply it and restart PC manually.In certain cases you might need to disable ASTER V7. You can do it by pressing Disable ASTER and restart PC button on General tab of the ASTER Control panel. Your PC will be restarted at once. Be sure to disable ASTER V7 before you run system maintenance tasks, install new graphics cards or update video drivers.
- After you have successfully run extra workplaces, you
can arrange your input devices using Input tab of the ASTER Control
panel. You will find all the connected keyboards and mice in the list of
input devices. To specify a workplace number for an input device,
double click in the Place column, type the number and press Enter.
New input devices arrangement becomes effective immediately after you Apply it. If you have lost the control over the setup workplace (in result of some wrong arrangement) you can override the arrangement with CTRL+F12 key. You may have to press CTRL+F12 several times until it moves all the input devices to the setup workplace. Then you can retry with another arrangement.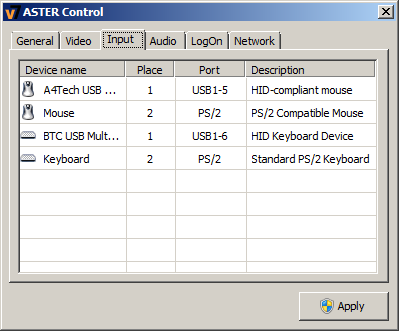
- You can also arrange your audio devices (sound cards)
among the workplaces or make them shared by several workplaces. Use Audio
tab of the ASTER Control panel to make the arrangement of audio devices.
Every single sound card may be presented as a set of separate audio devices of different types. You can setup those devices individually.
Unlike the other arrangement tabs, Audio tab allows you specify several workplace numbers separated with comma to make one audio device available for several workplaces, or leave the field blank to make the audio device unavailable at all. To specify the workplace numbers for an audio device, double click in the Place column, type the numbers and commas and press Enter.
New audio devices arrangement becomes effective immediately after you Apply it. However you may need to restart your sound applications if they were running while the arrangement is changed.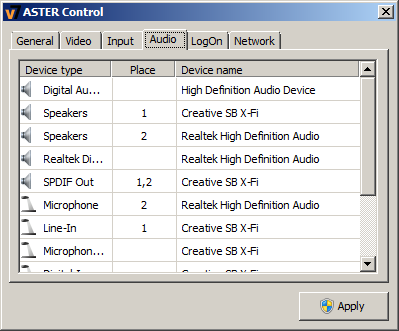
-
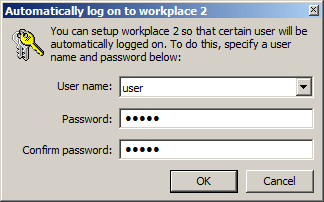
Using LoOn tab of the ASTER Control panel, you can setup workplaces so that certain users will be automatically logged on.
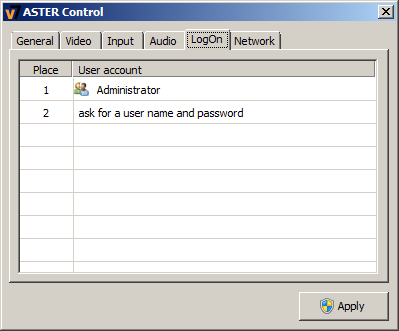
You can provide each workplace with a user name and password for automatic logon procedure. To do this, double click in the chosen workplace row, so automatic logon setup box will be opened for that workplace. Select or type a user name and password there, press OK and then Apply changes.
If your PC is connected to domain, you can specify domain user accounts as well by typing domain name before a user name with backslash separator (for instance, domain\user). If you want to disable automatic logon procedure, select ask for a user name and password in the user name list.
-
To function properly, some network programs (including network games) may require different IP addresses bound to different workplaces. It may also be required for establishing network connection between workplaces and for distinguishing different workplaces in the network. You can use Network tab of the ASTER Control panel to bind IP addresses to workplaces.
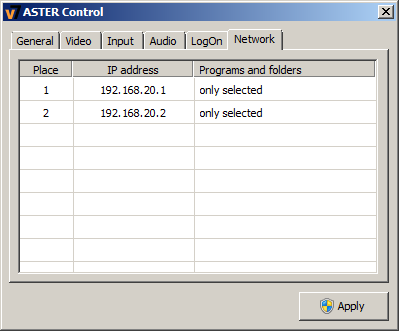
To bind certain IP address to a workplace, open IP address setup panel with double click in the chosen workplace row, then select the IP address from the list of IP addresses available at your PC. The list of available IP addresses includes all static (permanent) IP addresses that belong to existing network adapters. If the number of available IP addresses is insufficient, you can add static IP addresses to existing network adapters, or install a virtual network adapter and then add static IP addresses to it (see How to add IP address to network adapter and How to add virtual network adapter)
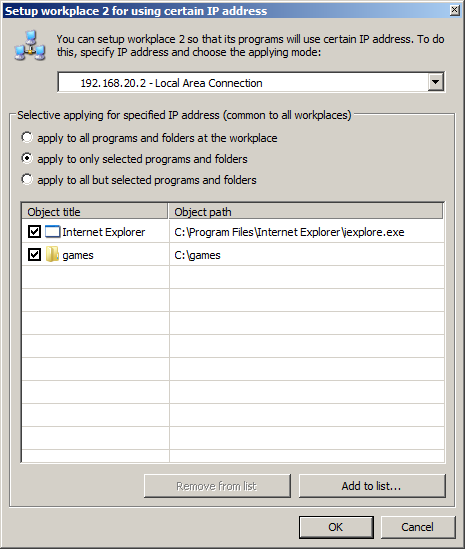
Bound IP address can be applied to all network programs or to only selected ones (and also to all but selected ones as the third option). For selective applying you can choose certain programs or folders containing programs. In case of folder the IP address will be applied to any program run from that folder.
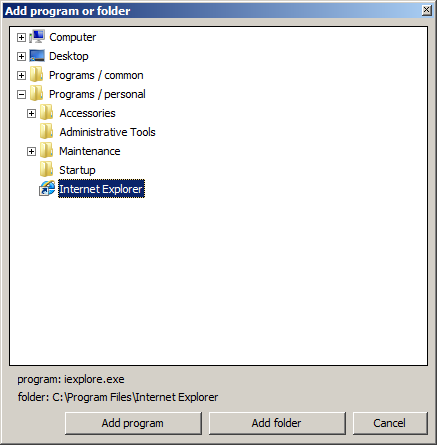
To add program or folder to the selective applying list, press Add to list button and choose the object from the directory of programs and folders. A program can be added to the list not only as a program itself, but also as a containing folder. To temporary disable applying IP address to a program or a folder without removing it from the list, just uncheck the checkbox in the related row of the list. To save all the changes made in the IP address setup panel, press OK and then Apply. New IP addresses settings become effective for the network programs that were run after saving changes.
Important note. Using this IP addresses binding function you should understand that it denies using all available IP addresses except one bound to the workplace, and consequently it binds (selected) network programs to certain network adapter owning that IP address. Thanks to that the network programs will not be able to access networks coming through other network adapters or by remote access VPN/dial-up connections (it is often the reason of troubles with accessing the Internet while using IP addresses binding function). To make it possible for network programs to access those unavailable networks, you can additionally use some routing utility (the program that routes data between different networks, particularly it can be standard "Internet Connection Sharing" service provided by the operating system).
- Technical support for ASTER V7 is available in English by electronic mail: support@ibik.ru.