
© IBIK Ltd
Multi-user Extension
for Microsoft Windows 7/8/10
1.1 Install the Aster software - run the installation package Setup_ASTER212.exe
1.2 During the installation, it is recommended to create a system recovery point. In case of any troubles with the ASTER installation or uninstallation it will be possible to return your system to the original state:

1.3 Then you should read the software description and accept the ASTER end user license agreement:


1.4 At the current step besides the installation folder you might automatically set the parameters of power supply and operating system loading which are recommended for Aster operation.
Settings – «Optimize the power supply parameters»
The setting «Disable Fast Boot» forbids this mode which speeds up the operating system loading, but it can cause problems for extra workplaces of Aster.
The checkbox is inactive if the Fast Boot is already disabled or if the program is installed in Windows 7.
These parameters also could be adjusted by yourself and after the installation of Aster:


After the ASTER software has been installed, you will find two new shortcuts in your Windows Start menu:
These shortcuts may not be seen in the Start menu in the list of recently used programs, but they can always be found in the section All Programs. Setting ASTER will be possible only after restarting system.
With effect from version 2.12, ASTER automatically generates a backup copy of information about active licenses to save on the software licensing server. This copy allows for recovering all your activated keys by several clicks. It can be useful in the event of crash, disk formatting, or if you cannot remember serial numbers and have to restore all purchased licenses. The backup copy is created after every activation and sent to server.
To identify your computer, each operating ASTER copy gets a unique identifier which is automatically created in the first run of an ASTER version when the following information message is displayed:

After pressing «OK» the unique identifier is created and displayed in the following window:

You must save it in a safe place, for example, your notepad or any cloud storage. Better not save this ID in the same computer otherwise it may disappear in the event of a system crash.
Further on this ID will be displayed in the bottom left corner of the software main window «ASTER control»:
By default, ASTER has a 30-days trial period. During this period, you can test all functions of the program and make the final decision of buying it. You will be able to use ASTER with no functional limits until the trial period expires. After the trial period has expired, any attempts of starting the program will make the user go either through the license activation procedure or through software uninstallation. To continue you have to purchase and activate the license.


During the trial period after launching the program, a window will pop up with the request to enter the activation key and with the information about the duration of its free use. You can also go to the activation procedure from the «About» page at any time. To activate the product you need Internet connection. Click the «Register» button to start the license activation procedure, enter the activation key and click the «Activate» button. After the successful activation, you will need to restart the program ASTER Control, as you will be offered to do.
The purchase and activation of the permanent license (unlimited by time) gives you the right for an additional 30-day trial period. This period will allow you to test ASTER with more terminals, and possibly make a decision of buying extra workplaces. All your purchased licenses are added up. However, you should remember that currently the number of ASTER terminals is limited to 12.
The count of the used days of the additional trial period starts only after the test terminals activation. It allows you to make a decision about the expediency of buying the extra licenses later, when you make sure that your computer operating system allows working comfortably with the existing workplaces, and you want to check the possibility of increasing the number of terminals. You can activate extra trial terminals using the activation dialog mentioned above (you will see the button «Activate Trial Terminals»), or from the context menu in the «Terminals» tab:


If you have installed the beta-version ASTER V7 v2.0, you should deinstall it and install the release version, otherwise the activation will not be successful!
Moreover, the key will become invalid until we solve the problem which you asked the helpdesk to solve!
Contrary to the ordinary activation ID (serial number) which is mostly intended for ASTER activation on a single computer, using a packet activation ID (packet serial number) ASTER may be activated on several computers. The packet serial number is useful in multiple ASTER installations, for example, in companies, or while distributing computers with preinstalled software including ASTER. Personnel responsible for ASTER multiple installation and activation on many computers have only to save and use just one (packet) serial number, and not a lot of different numbers for which one has to remember binding of the number with a specific computer.
The packet serial number is inherently an identifier (reference) of several ordinary serial numbers of the same type. While purchasing a packet serial number you have to indicate a license type (Home or Pro), for the Pro license you have to give a number of ASTER workplaces to be licensed on all computers and a number of computers where you suppose to use a packet serial number. Please be aware that the licenses in the package will be absolutely identical, that is the same type (Home/Pro) and the same number of workplaces on each computer. In generation of a packet serial number there is created the indicated number (equal to the number of computers in order) of ordinary serial numbers and for this packet of ordinary serial numbers one unique packet serial number is created that you will obtain (together with a list of ordinary serial numbers herein).
Manual activation by the packet serial number is carried out in a completely similar fashion as activation by an ordinary serial number i.e. you enter this number in the relevant dialog activation box. The packet serial number is sent to the ASTER license server, where the server selects from the relevant package a free (i.e. not yet activated) ordinary serial number, activates it and attaches to the computer which sent the activation request. In case of a repeated activation request from the same computer the server finds out the corresponding entry and sends the registration information which already is in the database. In other words, in accidental (or intentional) repeated activations the new ordinary serial number will not be spent.
One of popular methods of ASTER installation is the mass distribution of ASTER as a part of a hardware and software system, for example, for the IT room.
The technology is as follows. On a computer (hereinafter referred to as a master computer) the operating system is installed, further a predetermined software setup including ASTER. After installation of ASTER on that computer the ASTER Master License is created with the designated packet activation ID. Afterwards copies (clones) of a required number of similar disks are made from HD of this computer. Further these clones are installed in clone computer s of the master computer, i.e. the computer with the same hardware setup. When on the clone computer ASTER Control is run, it finds out the Master License on disk, and practically without operator’s interference performs ASTER activation by the packet serial number which is a component of the Master License. It greatly improves the ASTER activation process on multiple computers within this delivery structure.
First of all, you have to purchase the ASTER packet serial number of the required license type for the needed number of computers.
After ASTER installation on the master computer and functional check of the entire supplied software system (including ASTER) on this computer you have to run ASTER with the option --make-master, for this purpose you have to perform the following command (closing beforehand ASTER Control, if it is in operation):
asterctl--make-master
You will see the following:

Enter the purchased packet serial number in the box ‘License Package’; if you wish for security to protect against the usage of your packet serial number by unauthorized persons, enter the password in ‘Password’. In this case, in ASTER activation on clone computers it will be necessary to enter this password.
Hereupon press the Create ASTER Master record button. As creation of the Master License implies removal of all existing ASTER licenses you must confirm this step:

Naturally, for creation of the Master License you will be asked to present administrative privileges.
After this operation you may start to clone the master disk for the required number of clone disks.
From now on you cannot run ASTER on the master computer until you clean the master license from the master computer:

In order to remove the Master License from the master computer (and also from the clone computers if appropriate), you have to perform the command (shown in the previous screenshot):
asterctl --clean-license
After that the ASTER Master License will be removed from the computer and you can use it for creation of the next set of clone computers for another contract/purchase order for your hardware and software system.
Automatic ASTER activation
An (almost) auto ASTER activation takes place in initial startup of ASTER Control on the clone computer if software finds out the Master License on disk. If the Master License was created without password protection only a proposal to activate ASTER will be displayed:

If the master license in the course of creation was password protected you have to enter this password:

After entering the password (if need be), and pressing the Activate button, all that is needed from the operator is to click to confirm elevation of privilege up to the administrator level. Further activation will be made automatically in unattended mode.
ASTER licenses are recovered from the backup copy in «ASTER Activation Dialog» (to get it press «Registration» on a tab «About»).
Click a tab «Restore/Deactivate» of this dialog (in so doing there may be a several second delay as in this case the software connects to the license server to receive a list of backup copies).

Check to be sure that the box Installation ID shows just your ID, if not, enter the right one. Such situation may result from the loss of information about this ID due to the system crash, disk reformatting and so on. In such event the software «ASTER Control» will create a new ID as it was described in the chapter «ASTER Installation Identifier», and this new one by no means will coincide with the former ID.
After entering the ID a list of available backup copies for this identifier will be updated. In the dropdown list «Backups» select a required copy (items of the list are sorted as descending values by dates of copies generation, so the most actual copy will be the first in the list).
Pressbutton «Restore License». The software will download the indicated backup copy and restore all license information saved therein. Afterwards you have to rerun the software (and if ASTER has been run, hit the reset button), and alterations will come into effect.
You may deactivate all or a part of the purchased ASTER licenses. You may need it, for example, if you have to transfer licenses to another computer, or to correct your errors in the product activation (you confused serial numbers and as a consequence activated the license not on the computer for which it was intended). Deactivation is performed in the window «ASTER Activation Dialog», on a tab «Restore/Deactivate», and includes several steps. As a result of deactivation process, the licenses you have chosen become invalid and instead of them you will get the new equivalent licenses.
The first step is generating requests for license deactivation. Press the button «Prepare Deactivation». The window appears with a list of valid licenses activated on this computer as follows, select licenses you want to deactivate:

Enter a message where it is advised to denote the deactivation reason, and, though it is essentially not encouraged, you may indicate in the letter your specific wishes concerning deactivated licenses. For example, you may link the licenses you will get instead of deactivated ones to the other name/or Email address (see below).
Change if appropriate the name and the address in boxes: «Your Name» and «Your E-mail». They will be used in generation of new serial numbers which you will get instead of deactivated ones.
Further press« Send» Your request will come to the license server to be processed by the ASTER support team. You will receive the message on successful request sending:

It has a unique number of your request which is advisable to save for security (for reference if any problems arise).
At present, due to some limitations of the license server, the processing of deactivation requests cannot be fully automated, and can take some time. During this period, the licenses you have chosen for deactivation remain valid, and you can use ASTER. At each startup the program «ASTER Control» will check whether the requested data is ready, and when your request has been processed you will get notification in form of the popup box with the following message, or in form of notification on the taskbar if the ASTER icon is iconified in the bottom left corner:


After you receive this notification you may deactivate licenses.
To do this, press «Deactivate Licenses» in the box «ASTER Activation Dialog» on the tab «Restore/Deactivate». The software will get in touch with the license server, read out information required for deactivation and request to confirm deactivation:

If yes, deactivation of selected licenses will be carried out and instead you will get new keys which will be displayed after deactivation (information on a number of places for that key is given within brackets):

Copy them and use at your discretion.
If for some reason you could not have saved the new provided keys (for instance, inadvertently closed the last dialog), don’t worry. Just repeat the last step of activation (starting from pressing «Deactivate Licenses»), and you will get a list of new keys again.
Supporting of license deactivation and backup copies involves sending some information to the license server. This includes just the following data:
Data transfer and storage in the license server database is performed in encrypted form. You may see it for yourself that the list above does not contain any data except those you provided at the time of purchase, received from the license server after purchase and after license activation, and those which are baseline for backup and deactivation.
When calling up a program «ASTER Control» with full administrative privileges (Run as Administrator) the tab «About» will display the reference Check For Updates. By pressing this reference the software connects to the ASTER license server, and if the server has a fresher version than you will get information about this updated version:

When you press «Download» you will be asked to download that version.
Attention! The ASTER license is valid only for one computer – with unchanged CPU and HDD it remains valid with any changes of hardware/software including disk formatting, Windows reset, etc. All ASTER licenses except Home can be used for an unlimited time. The validity of the license ASTER Home is 1 year.
There are several types of licenses for the software:
Pro for 2, 6 or 12 working places for an unlimited time. This license also allows for connecting additional terminals (up to 12) by activation of additional licenses Pro. The basic license for 2, 6 or 12 working places may be activated or transferred only entirely – a partial activation at several computers is not supported.
Pro for working place. This license is intended for an unlimited time, but it allows only connecting additional (up to 12) terminals for the already available basic licenses Pro – it cannot be activated independently without the preset basic license.
Home - only 2 terminals for 1 year. The version Home is sold only with the annual license, i.e. within 1 year after activation you will have to purchase a new license. Also, the version Home supports only 2 working places and cannot be expanded for more.
All ASTER versions throughout the year after activation can be upgraded to the latest ASTER version free of charge. The version 2.00 and higher are upgraded automatically – without entering a new key, for previous versions please send the operating activation key to upgrade@ibik.ru– we will send a new key to you.
After 1 year all versions except Home can be upgraded at 50% discount: for versions 2.x and higher you have to purchase a special license for extension of the upgrade validity, for the rest – just send the operating activation key to upgrade@ibik.ru – we will send the 50% discount coupon to you.
Attention! To connect additional workplaces in the Pro-version of the ASTER - buy and activate an additional license Pro x1/x2/x6, but keep in mind that the number of workplaces ASTER on one PC - no more than 12. Before payment, you have to switch on an additional working place in the test mode and check its efficiency with a specific configuration of hardware/software.
In order to start the extra workplaces successfully, at first you need to configure the ASTER software, assign to each workplace a monitor, a keyboard, a mouse and a sound card, if necessary.
Before you start the ASTER configuration, remember the following important information:

Some configuration changes will take effect only after rebooting the computer. A display that a change in configuration requires a system rebooting is the «Reboot System» button appearing in the bottom left corner of the program window ASTER Control.
When you close the ASTER Control window, you will be notified that you should save changes if you have forgotten to do it, and in case you need to reboot the system, you will be offered to do it.
The ASTER Control program starts automatically when a user enters the system in the first (main) workplace. If you have not made the configuration of workplaces yet, the program will be opened in the other window, otherwise after the automatic start the program will be iconified in the Task Panel (system tray).
![]()
When closing the window ASTER Control in the first workplace, the program doesn't finish its work, but is minimized to a system tray. In order to finish its work choose the option «Exit» in the context menu of the program icon (the menu is called by clicking with the right mouse button on this icon). If you are not in the first workplace (it is possible, if ASTER has already been started), then you can launch the ASTER Control program from the Start menu
9.1 After launching the program, a window will pop up, in which you configure the ASTER software. Control elements (signs, buttons, lists, etc.) are accompanied with prompts such as «What is this». So, if you are not sure of the purpose of a particular element, you can always call this prompt. The simplest way to do it is with the hotkey – press Shift and F1 on the keyboard simultaneously. The other two ways to do the same: in the context menu (the right mouse button) choose the option «What is this», or if a window headline has a pictogram «?», click on it. Then the cursor will change its shape to the arrow with the question mark; point it to the control element which you need and press the left mouse button.
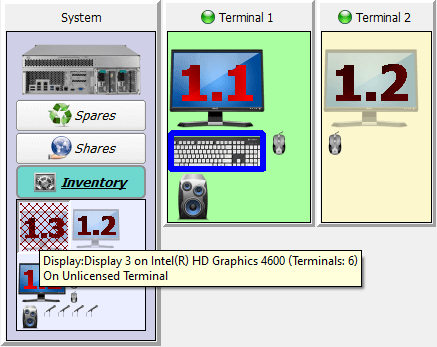
9.2 When you start the ASTER software for the first time, you should assign the monitors to the workplaces right away. Otherwise, the starting of extra workplaces will be impossible due to the absence of monitors for making desktops. It is necessary to assign the monitors before starting the extra workplaces. Other devices can be assigned later. You can assign the monitors and other devices in the «Terminals» tab of the ASTER Control panel. In this tab matching workplaces (terminals) and devices are shown graphically. Every terminal looks like a small window filled with devices. There is a «System» window in the top left area which includes a short list of all available devices on your computer. You can allocate them between the terminals. A system units depicted at the top of the System window, it has a context menu with options for different global system parameters. In the window below there are three buttons «Spares», «Shares» and «Inventory».
When you press these buttons, the panels for viewing the devices are opened or closed. The «Spares» panel includes the devices which are not assigned to any terminals, the so called free devices. The «Shares» panel includes the devices which are used by all terminals, the so called shared devices (note that the shared devices are not shown in the terminal windows in order to make them look simpler). The «Inventory» panel shows all the devices on your computer which can be allocated between terminals. You may change the picture scale using the hotkeys: the simultaneous pressing of the keys Ctrl and “+” zooms in the picture, Ctrl and “-“ zooms out. At the same time the scaling area depends on the current cursor position: if it is in the System window, the pictures in the panels «Spares», «Shares», «Inventory» are being scaled; otherwise it is the windows of the terminals.
The «Inventory» button (and the corresponding panel) is hidden by default. In order to see it you need to choose «Terminals Tab Settings» out of the tab context menu (click the right mouse button on the space free of Terminals and System windows) and check the option «Inventory» in the appearing dialog box.
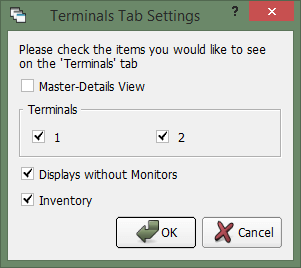
In the group Terminals» of the dialog box «Terminals Tab Settings» you can choose which terminal windows to show and which to hide. Also, pay attention to the option «Displays without monitors» in this dialog box and to the semitransparent (turned off) pictures of displays in the windows Terminals and System. In fact, the pictures of displays at the «Terminals» tab are the video surfaces of your video cards, which can be potentially connected to the real video outputs and to the monitors correspondingly. The semitransparency of the display picture means that this certain video surface is not connected to a monitor at the current moment. The option «Displays without Monitors» determines whether such displays will be shown in the ASTER Control program or not. By default, it is not marked and semitransparent displays are not shown. A display can be semitransparent even when the monitor is connected to a video output physically and powered on. It can happen when this monitor is not included into the Windows desktop.
Therefore, when you configure ASTER for the first time, it is strongly recommended that you connect all the monitors to the video cards, extend the desktop onto all the monitors and setup desired resolutions for them to ensure the monitors are properly configured and functioning well. So, you can minimize the amount of semitransparent (turned off) displays and you will get a better choice of displays to allocate them between the terminals by easy visual means.
You can expand the desktop and set the resolutions of the monitors using the item Display of the Windows control panel (Control Panel->Display-> Change Display Settings). To open this item directly from the program ASTER Control press the right mouse button at the system unit picture of the «System» window and choose the option «Desktop Settings» from the popping up context menu. Also, most of system settings are available through the context menu of the system unit icon in the «Terminals» panel.
You have probably also noticed that some devices are shown: in a special way: in the niche behind the grid. They are the so called «On Unlicensed terminal» – the devices, assigned to the workplaces, which are not available at the moment because you have bought just a few licenses, and a device is assigned to the terminal with the number exceeding the amount of your licenses. Such a situation can occur, for example, after you have assigned a device to the terminal with the big number in the trial period, and then have bought the license for fewer terminals. If you point the cursor to such a device, you will see in the popping up prompt to which terminal this device is assigned (the assignment of a device is in the parentheses after its name). You can keep the device in this state of «On Unlicensed terminal» to save the its association with the terminal for the future, or you can assign it to your available terminal.
9.3 When you assign the monitors to the workplaces several options are possible:
If you run the ASTER Control for the first time, all monitors will be assigned to the first terminal, as a rule. The easiest way of assigning a monitor (or any other device) to a workplace is by Drag & Drop: click the left mouse button on the monitor picture (or other device) whose assignment you want to change, drag it to the desired terminal and drop the mouse button (drop the device into the terminal). Don’t forget that the «System» window includes the panels in which you can find the devices that cannot be seen in the terminal windows at the current time. You can drag and drop the devices both between the terminal windows and between the terminal windows and the buttons and panels of the «System» window (forbidden destination will be denied).
Not every match between the device and the terminal will be available because there are conflict configurations that won’t work. In the simplest cases the unavailability of the drag and drop destination will be shown by changing the cursor (a restriction sign will appear – a strikethrough circle). In case of monitors assignment it is very easy to get a conflict and not always evident how to avoid or solve it. That is why the automatic resolving of conflict situations for monitors is used: when the monitor is dropped at the terminal window, the configuration availability is checked. If conflicts are discovered, the situation, according to certain rules, is transformed into a conflict-free one. At the same time the monitors which are deleted from the terminal windows with the purpose of resolving the conflict are placed into the «Spares» panel (and this panel will open if it was closed).
One of the questions appearing in assigning the monitors (and other devices) to the workplaces is how to match the real computer equipment and the pictures showing the equipment in the ASTER Control program? Some methods facilitating this task are realized in the program:
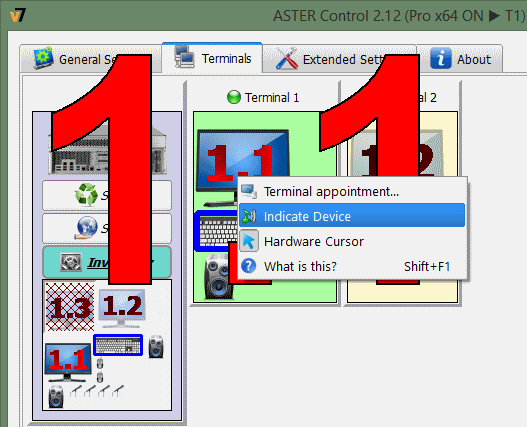
Another method of discovering a picture for real equipment is the method «disconnect/connect». If a device allows «hot» connection and disconnection (for example, a USB device), then you can do the following: disconnect (pull out) the device, and some time later -- connect it back (put it in). In the ASTER Control program window you will see the just connected device in the flashing purple frame. However, if necessary, the corresponding panels of the «System» window will be open and the scrolling of the «Terminals» tab will be performed so that the picture of the device would be seen at the screen.
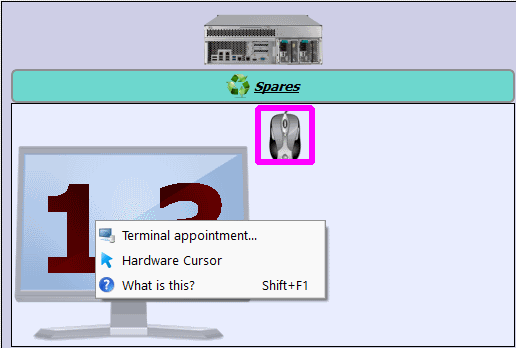
Besides the Drag& Drop method, the assignment of a device to a terminal might be done through the device context menu, specifically the option «Terminal assignment». A dialog box will pop up, its appearance depending on whether a device allows the shared use by several terminals or not.

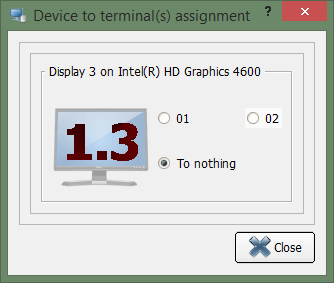
In the first case you can tick the boxes near several numbers, disconnect the device from all the terminals (send it to the «Spares»), or assign it to all terminals (put it into the «Shares»). In the second case you can assign just one terminal or send it to the «Spares».
The context menu for the monitors can also include the «Hardware Cursor» switch. It appears only for shared video cards (video cards used by several terminals). The switch allows to choose whether the hardware or the software cursor must be used for this monitor. If the hardware cursor is used, then the icon showing a cursor is highlighted gray, if the icon is shown without highlighting, then the software cursor is used. To change the parameter to the opposite one click the left mouse button on this menu item:
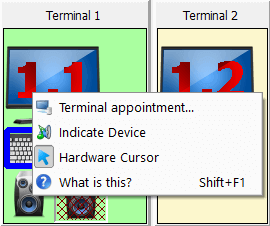
Software cursors are totally independent from each other, but they can communicate in the wrong way with the intensive graphics in the applications (can leave trails when moving or totally disappear from the display).
Hardware cursors do not communicate with the graphics in the applications (don’t leave trails and don’t disappear), but they can’t have different shape on the monitors of one graphics card. Hardware cursors suit better for games and full-screen graphic applications where a clear cursor visualization is more important than its shape. For other applications we recommend using software cursors. Different monitors of one graphic card can use different types of cursors (for example, a gaming place monitor can use a hardware cursor, and the other monitors – software cursors).
9.4 After you have assigned the monitors to the workplaces, you can start ASTER and run extra workplaces. To run ASTER press the button «Enable ASTER and reboot PC» at the «Extended Settings» tab of the ASTER Control panel. The program will request the confirmation of rebooting, and if you answer yes, your PC will be restarted immediately:
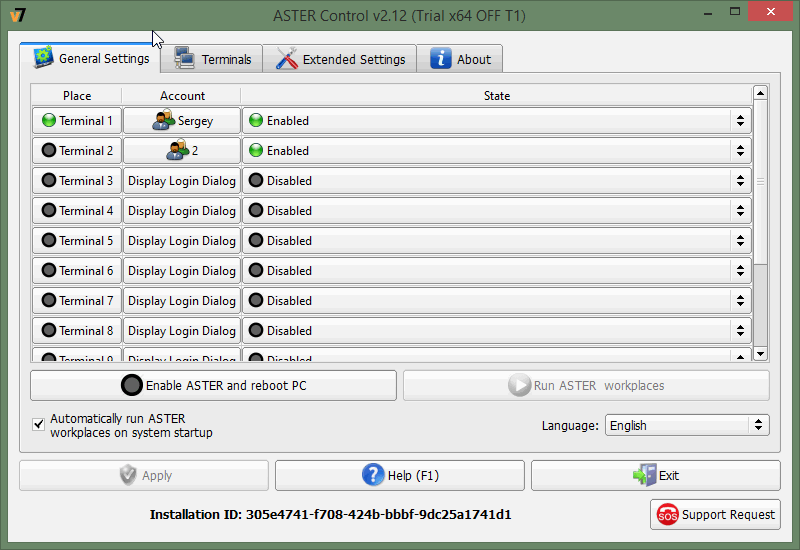
If you have troubles with displaying desktop or with running your computer after you have enabled the settings of the new monitors, you can reboot the computer in a safe mode, disable ASTER by pressing the button «Disable ASTER and reboot PC» and then (after the normal computer rebooting with disabled ASTER) make a different configuration of the monitors. To start your computer in a safe mode press button F8 several times at the very start of booting the computer (until you see the Windows logo and the caption “Starting Windows”) and choose the option Safe Mode in the menu of starting variants.
9.5 After restarting the computer with the enabled ASTER and set monitors’ configurations, you can run extra workplaces by pressing «Run ASTER» at the «Extended Settings» tab of the ASTER Control panel.
At the same time, you will see a Windows Welcome Screen on the additional monitors. Before you assign the keyboards and the mice to the workplaces, you can make sure all workplaces are functioning well by switching keyboards and mice using hotkey CTRL+F12.
If the button «Run ASTER» is unavailable (inactive), it most probably means that the video devices arrangement is not suitable for running extra workplaces (or the monitors haven’t been assigned to the workplaces). In this case try making a different monitor arrangement. Apply it and reboot the computer.
9.6 In certain cases, you might need to disable ASTER. It can be done by pressing the button «Disable ASTER and reboot PC». The program will ask rebooting confirmation, and if you answer yes, your PC will be restarted immediately.
It is strongly recommended you disable ASTER before you run system maintenance tasks, install new graphics cards or update video drivers.
After you have successfully run the extra workplaces, you can arrange your input devices to the workplaces. You can do it using the Drag & Drop technique or the option «Terminals assignment» of the device context menu as it has been described above.
If the input devices arrangement was wrong and after applying the settings you have lost control over the computer you can override the arrangement with theCTRL+F12 key. You may have to press >CTRL+F12 several times until it moves all the input devices to the setup workplace. Then you can correct the wrong assignment of devices.
As a rule, this hotkey is rarely used since no need to use it arises. However, certain software (for example, Adobe products) may use this key combination. As the ASTER driver catches it faster than the software, it may entail inconvenience. The computer context menu on the tab «Terminals» of the «ASTER Control» program has a menu item «Keyboard/Mice switch hotkey» which allows either for reassigning this key combination or disabling it at all.
After selection of this item a dialog will appear:
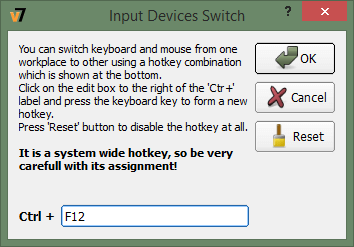
Left-click on the input box in the bottom part of dialog and press the keyboard key which you would like to use together with the pressed Ctrl as an ASTER input device switch hotkey. The input box will display the pressed key. Some common combinations (such as Ctrl-F4, Ctrl-C, Ctrl-S, Ctrl-V etc.) are forbidden to use for this purpose. If you press such forbidden key, the content of the input box will not change. Press «Reset» button to disable this hotkey at all.
A new assignment will be considered for only after rebooting.
9.7 You can also assign your audio devices (sound cards) to the workplaces or make them shared by several workplaces. You can also assign the audio devices in the «Terminals» tab of the ASTER Control panel.
Every single sound card may be represented as a set of separate audio devices of different types. You can setup the audio devices belonging to one audio card to the workplaces individually. Unlike other devices, assigned strictly to one workplace, an audio device can be shared by all the terminals and kept at the «Shares» tab.
The new assignments of audio devices take effect right after pressing the «Apply» button. However, to register the changes you might need to restart the audio applications which were working at the moment of applying new arrangements.
9.8 The workplaces can be configured in such a way so that there is an automatic login into the system with certain user account data at the start. You can perform this setting at the «General Settings» tab of the ASTER Control panel.
For every workplace you can set a login and a password, which will be used for the automatic login to the system. To do this press the button in the column «Account» in the row of the chosen workplace. A dialog box of account configuration will be opened.
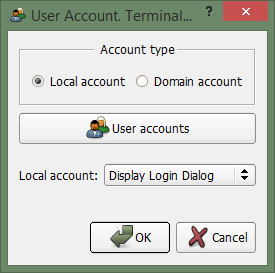
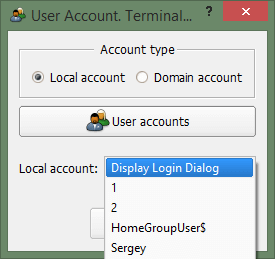
You may use not only your local account for automatic login, but the domain account if your computer is connected to the domain. You have to choose a corresponding option at the switch «Account type». For the local account choose an account at the drop down list «Local account» (the option «Show login dialog» cancels the automatic login from this workplace). If it’s necessary you may also set a password and confirm it.
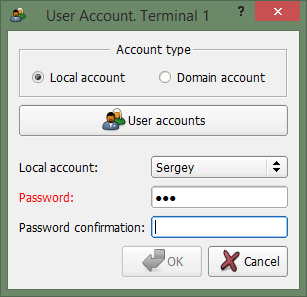
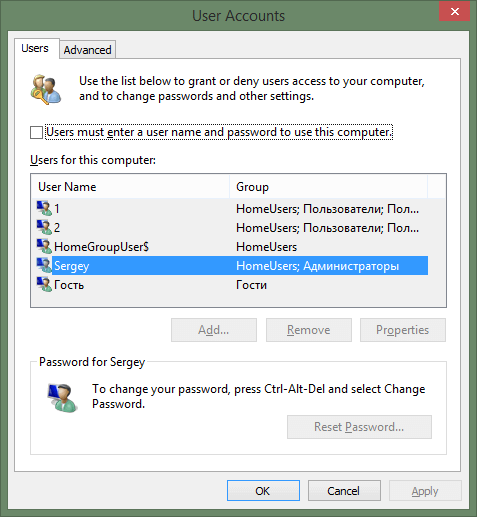
The button «User accounts» will open the system window «User accounts», where you can see, edit and add accounts if you have enough rights for it.
If your computer is connected to a domain, you can configure an automatic login in the domain. Press the switch «Domain account». The window will change its appearance a little bit.
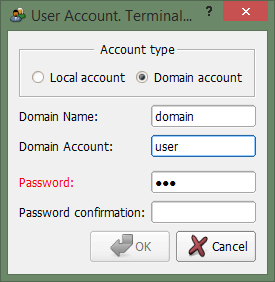
Enter a domain name, a domain account and, if necessary, a password and its confirmation.
After making the changes press the button «OK» to apply them (and don’t forget to press the button «Apply» afterwards in order to save your changes permanently). Press the button «Cancel» to reject any changes you have made at the configuration dialog box of the automatic login.
In the «General Settings» tab you may also specify selectively which workplaces will be enabled and which will not. To do it you have to choose in the column «State» of the according terminal row the option «Enabled» or «Disabled» from the two-element list (the first terminal is always on, you can’t disable it).
9.9 For the correct work of some network applications at the workplaces (including network games), as well as for the purpose of merging them and separating the identification in the network, you might need to assign different IP addresses to the workplaces. To assign the IP addresses to the workplaces you can go to the «Extended Settings» tab of the ASTER Control panel.
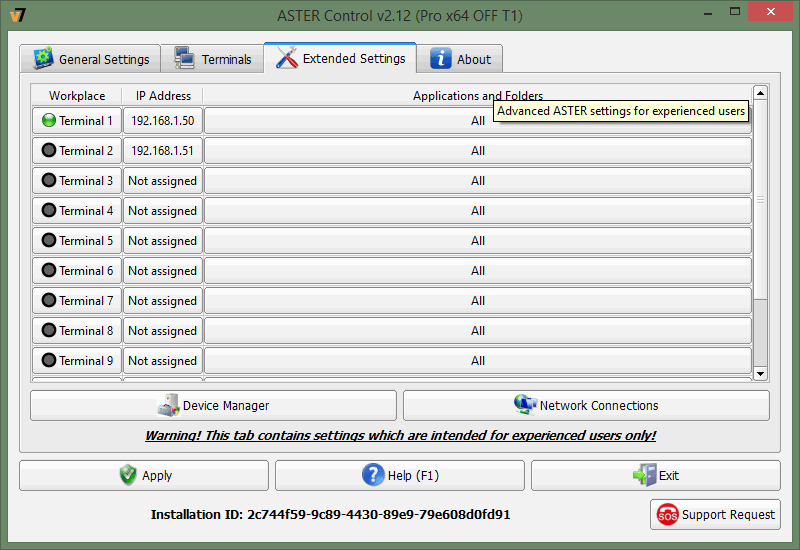
In the «Extended Settings» tab click the mouse on the row of the selected workplace to open the IP address configuration panel for this workplace.
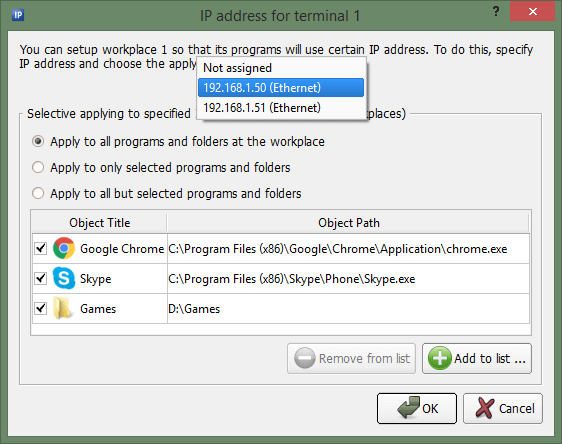
Choose a suitable IP address from the list of available IP addresses in your computer.The list of available IP addresses includes all static (permanent) IP addresses that belong to existing network adapters. If the number of available IP addresses is insufficient, you can add static IP addresses to the existing network adapters, or install a virtual network adapter and then add static IP addresses to it (see How to add IP address to network adapter and How to add virtual network adapter). For the quick access to the Windows Control panel, which is mentioned in these documents, you can use the buttons « Device manager» and «Network connections» in the «Extended Settings» tab.
An IP address bound to a workplace can be applied to all network programs or only to the selected ones (and also to all except the selected ones). For selective applying you can choose certain programs or folders containing programs. In case of the folder the IP address will be applied to any program run from that folder. At the bottom of the IP address configuration panel there is a table with the list of programs and folders. There are three mutually exclusive switches above this table. If you choose the top switch, the list is ignored and the IP address is applied to all network programs starting from this workplace. The medium switch sets the IP address applying only to the programs and folders from the list. The last switch sets the IP address applying to all the programs and folders in the computer, except those in the list. To the left of each element in the table there is a switch which allows excluding the element from the list temporarily without deleting it. If the switch has no tick, then the corresponding element will not be included in the list of programs and folders, to which the IP addresses assignment is applied. To delete an object from the list totally you should choose this element from the table and press the button «Delete from the list».
To add a program or a folder to the IP-address selective application list, press the «Add to list» button and choose the object from the directory of programs and folders:
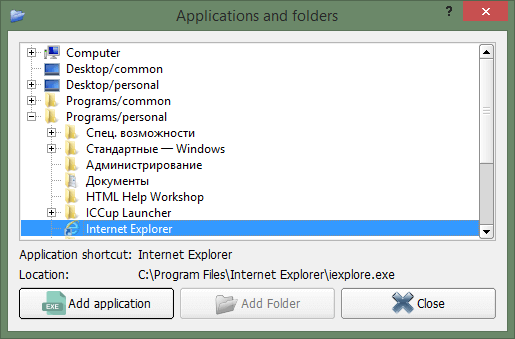
A program from the directory can be added to the list not only as a program itself, but also as a containing folder. To do it press the «Add program» or the «Add folder» button. You will see when the object is added in the table. The addition of folders is available only from the root node «Computer». To finish the choice press the «Cancel» button. To save the settings press the OK button on the IP address configuration panel, and then the Apply button on the ASTER Control panel. The new IP addresses settings become effective for the network programs that were run after saving changes (pressing the Apply button).
Important note. Using this IP addresses binding function you should understand that it forbids the (selected) network programs to use all available IP addresses except the only one bound to the workplace, and consequently it binds network programs to a certain network adapter owning that IP address. For this reason the network programs will not be able to access the networks coming through other network adapters or by remote access VPN/dial-up connections (it is often the reason for troubles with accessing the Internet while using the IP addresses binding function). To make it possible for network programs to access those unavailable networks, you can additionally use some routing utility (the program that routes data between different networks, particularly it can be the standard "Internet Connection Sharing" service provided by the Windows operating system).
9.10 find the information about the program, system, licenses for workplaces and the owner of the licenses in the «About» tab:
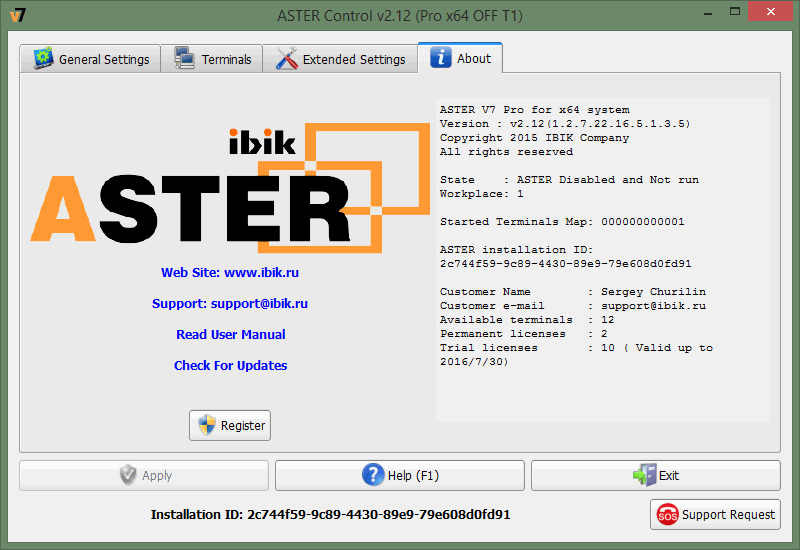
Here you can find the «Report» button. When you press it you get an extended information file about your system for the support service, and also the most important links and the program «Register» button.
In the bottom right corner of ‘ASTER Control’ the button ‘Support Request’ is added:

In addition, most error messages are supplemented with a similar button:

Upon pressing the button ‘Support Request’ the following dialog will be displayed:

If you select this dialog from the error message box then in the basis of the text of error message the description of problem will be automatically formed (the image above precisely illustrates this case).
You may select a request type which is the most suitable for your situation from the Request Type list (upon opening this dialog from the error message box the most suitable type will be chosen automatically). Based on this selection there will be formed the content of the ASTER Technical report, i.e. information that will help to solve the problem, and will be sent to ASTER Support.
Presently, there are the following request types:

In the box ‘Enter the problem description or a question here’ you have to describe an evolving problem as detailed as possible, or ask about the matter of your concern. Please do not take any chances with this description if you want to get the solution of problem or answer to your question as soon as possible.
Upon opening the dialog ‘Support Request’ from the alert box the description will be automatically formed from the error text. You may add it with your comments or supplements however the text of error report should remain intact.
You have to give a current e-mail address. The e-mail box subject to the existence of ASTER registration (license) is filled from credentials. This box may reflect incorrect or obsolete information. You must check this box and correct if appropriate as this address will be used by Support to send a reply to your request.
By default, the ASTER Technical Report content is selected on the basis of the request type you have selected. However you can correct the content by three methods:
After selection of a request type the content of the ASTER report is formed on a basis of request type by selecting one of the standard report types listed in the lower-left part of dialog ‘Support Request’. You may where applicable (for example, by request of Support) change this selection by radio buttons. A volume of information included in the report is increased depending on position of the radio button top to bottom, i.e. a report type located lower contains information which is located in superior report types, and adds extra data to the report. For request types ‘Just a question’ and ‘Cannot activate ASTER or lost of activation’ a report type is fixed and cannot be altered.
Report types and data herein:

The report includes three latest minidumps created 7 days at the earliest. If there is no such dumps the relevant message is displayed.
Minidumps can significantly increase the size of report, furthermore some problems may evolve in sending the report by mail, thereforewe advise to apply this report type only when you are asked by ASTER Support.
If you consider that it will assist to solve your problem, or you are required by ASTER Support to do it, you may add the technical report with computer files.
To do this, press ‘Add Files’ button in the lower-right part of dialog and select the required files in the standard file opening dialog. The selected files will be displayed in the list below:
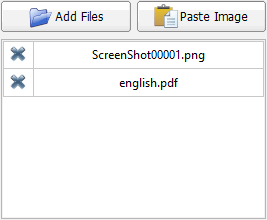
To remove a file from the list, click cross icon to the left of file name. Clicking file name will open it for view. Opening is performed using an application assigned in Windows for this file type.
Please do not use excessively the opportunity of adding files to the ASTER report as it increases the report size, beyond that certain files not always pass through mail server filters that may keep the request from delivering to ASTER Support.
Besides files, the ASTER report can be added with clipboard content. Such opportunity is particularly useful for adding screenshots to the report: you need just to select a window to “snapshot” and press the key combination Alt+PrintScreen, to put the screenshot in clipboard, then press ‘Paste Image’ button in the request creation dialog:
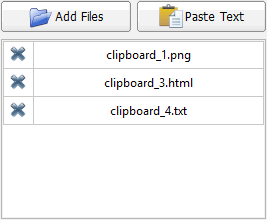
Keytop ‘Paste…’ is changing depending on the clipboard content:
By pressing the button you create temporary files with names ‘clipboard_N’ of the relevant type (PNG, TXT, HTML), these files are added to the list of files attached to the report. You may scroll the content thereof clicking a file name in the list.
From time to time, it is necessary to edit a file received from clipboard (for example, in order to highlight certain elements in screenshot or to paint out private information). An application which opens on mouse click a file in the list of files for report may not support file editing. Therefore this file should be opened by an application which allows for performing the required function. The files created from clipboard have Windows- generated unique names in the temporary directory, and these names do not coincide with those displayed in the list. To get a real name and folder with the file, mouse over the required file in the list, the tooltip will contain the pathname:
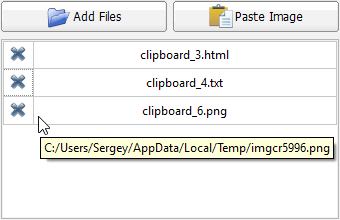
Please try to make the volume of transmitted images as small as possible, in particular, use the combination Alt+PrintScreen which take the shot of the selected window only, and avoid using the single key PrintScreen which snapshots the whole home screen.
The dialog ‘Support Request’ is opened from the error message box in modal regime. In this regime, until the dialog is opened other boxes of ‘ASTER Control’ are inaccessible, so certain difficulties will emerge if you wish to snapshot ASTER Control box. Here two solutions are possible:
After filling the problem description and making decision on the structure of the ASTER technical report, you have to send a request to ASTER Support Request. To do this, press the ‘Send’ button. It bears repeating that entering your real address in ‘Your e-mail’ is important.
Upon pressing the button a zip archive with the technical report will be formed and the request will be sent to ASTER Support team. It may take several minutes. Please wait for completion of this process.
If sending is successful you will get the following message:
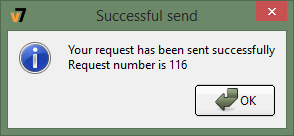
Just to be safe, store a request number indicated in the message.
If sending is unsuccessful, you will get the following message:
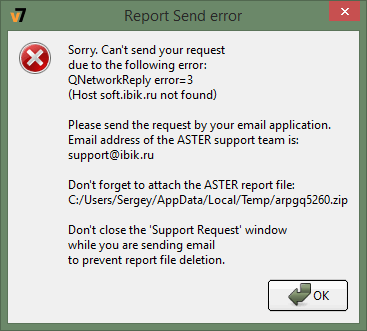
Error description may vary depending on causes, however in this case you are suggested to send the request through other means – by e-mail.
For that end:
![]()
Clicking this line you copy the file path in the Windows clipboard, and then you will be able to insert it in file opening dialog of your e-mail client.
To go to the new version 2.x, need send the serial number from the old version Aster to email: upgrade@ibik.ru
In case of problems with activation it is necessary to specify date and email which was used for purchase.
Tech support for ASTER is available in English by email: support@ibik.ru.
User guides and FAQs are here: www.ibik.ru/system-requirements, articles: www.ibik.ru/articles
Visit the forum: https://forum-en.ibik.ru for the answers to many different questions.
Visit the site, write to us – we always try to help our clients!